The program has two modes of operations called Ready & Shell. The user can easily switch between the two modes and out to the VOS command level as follows:
When displaying directories, files or links, SPS uses this parameter as a star-name (e.g. *.pl1). When displaying commands, include files or object modules, SPS uses this parameter as a match field. When displaying processes, SPS uses this parameter as a user_name mask (e.g. *.SysAdmin).
The type of objects VSS should display:
Select the required library path by cycling the Type field to Objects, Commands or Includes. The path name field will now be treated as a match string that SPS will use to extract the relevant files from your library paths. This works exactly like the -match parameter for the VOS help command.
When extracting commands (Type field = Commands), SPS will retrieve all internal commands that match your string as well as external commands.
An option to sort the objects before listing them:
A yes/no option. When set, (yes) SPS will activate the Omit function in which some elements will not be displayed on the screen. This is based on the user's setup. This feature allows the user to exclude files such as *.backup and *.out from any listings. For more detail see VS Configuration.
The name of the Profile record as it appears in the sps_vcs configuration table.
-report
The name of the pre-defined report. See vcs_reports.table configuration table.
Introduction
The SPS/VOS Security Shell eliminates unrestricted access to VOS and greatly enhances operators' and developers' productivity. Any operator, even with no Stratus experience, can become proficient and operate the system safely. The SPS/Security Shell is an indispensable environment for any mainframe trained personnel.Features
The sps_vss.pm program
Purpose
The command sps_vss.pm initiates and opens an SPS session. When the user calls SPS for the first time, SPS will start the session by selecting all the files in the user's current directory. SPS will then display the Main Screen.
Ready Mode		Shell Mode		VOS
Display-Form
Key	        ------------>

Type "shell",
Enter-Key       ------------>

Type "exit",
Enter-Key       ----------------------------------->

                      <------------	Shorthand-r
                      Cancel-Key ------------>
CRT Form
------------------------------ SPS/VSS -----------------------------
 Path:
 Type:     Files
 -sort:    name
 -profile: default
 -report
Lineal Form
sps_vss.pm [Path] [Type] [-sort] [-profile] [-report]
Arguments
Path/Match/User![]() Type
Type
In the case of command, includes, and object files, SPS will scan your library paths, find the object and display the objects' full path name. You can determine which include files your compiler picks-up or which objects are used by the bind command.
These functions provide a faster and easier way of executing the VOS 'help -match and where_command commands. They provide a way of locating include files and object modules. SPS will scan all your library paths and will display all the files that match your Match string. You can then issue commands or ask SPS to give you the full path name of the object. For more information see the Where Command Internal Command.![]() -sort
-sort
-omit![]() -profile
-profileThe Main Screen
Listing directories:

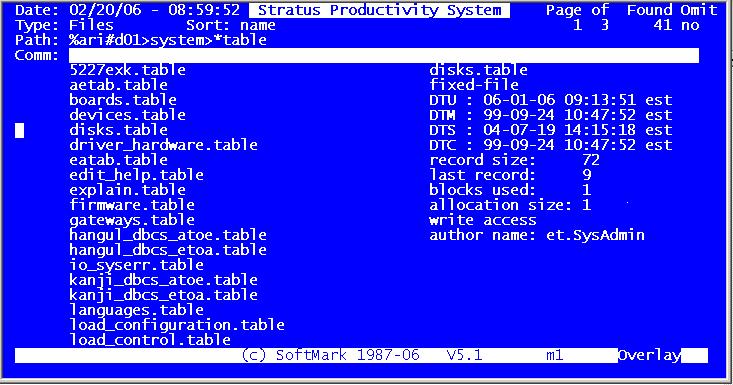
Listing *table files:
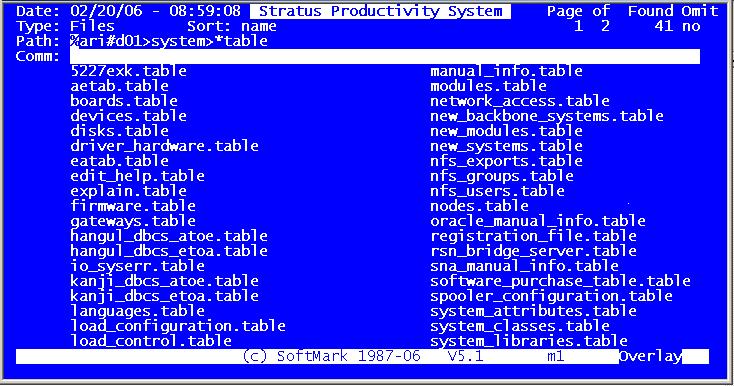
Listing *table files with Info-Mode":
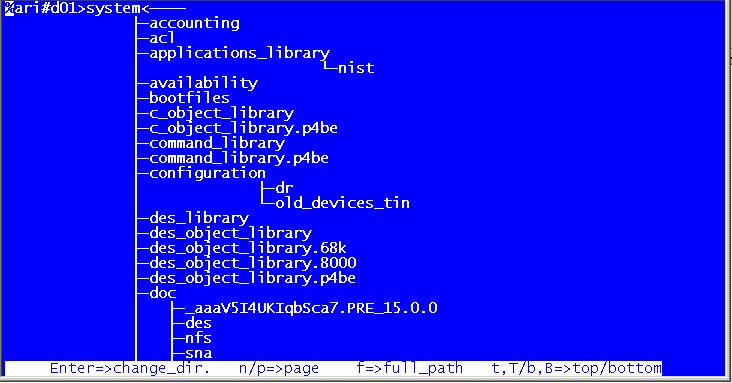
The directory tree structure:
h- |
SPS displays the Help screen, to return the Main Screen, press Cancel.
| |
t-top, | When the display indicates that more than one page was found, this request will position the screen on the first page. | |
b-bottom, | When the display indicates that more than one page was found, this request will position the screen on the last page available. | |
u-up, | This request will move the current directory one level up. You can use this function again to continue moving up the directory tree. The request will result in the following: The path name will be changed to the directory name which is in the next upper level of the hierarchy. | |
p-process, | When the user executes this request, VS will build a temporary command macro including all the commands typed in the operations codes area and in the command line and start the command macro as a subprocess. VS checks the command status after every step. If any step fails, VS will notify the user by sending an error message to the terminal's 25th line identifying the command that failed and a system error message. | |
i-info, | A toggle switch used to activate / deactivate the Information Mode. Use the Information Mode Switch Shorthand Request to enter/exit this mode. In this mode all information about the selected objects will be displayed. This is a much faster alternative for the display_file_status, list -links, where_command commands and more. To enter the Information Mode, position the cursor next to the object you are interested in and issue the shorthand request. The marked object name's status/information will be displayed on the right-hand side of the screen. If you have not positioned the cursor, the first displayed object will be selected. While tabbing or moving the cursor up or down in the Operation Codes Area, VS will automatically display the information for the next/previous object. | |
a-auto, | A toggle switch used to activate / deactivate the Auto Mode. | |
d-deltas, | A toggle switch used to activate / deactivate the Deltas Mode. In this mode, VS calculates process(es) meters based on the current interval. | |
+Next | SPS changes the current disk name (e.g. #d01) to the next disk-name on the system. | |
-Prev | SPS changes the current disk name (e.g #d01) to the previous disk-name on the system. | |
g-global, |
| |
o-out_file, | Using this request will enable you the browse the output file that the last process that VS started had created. Browsing is allowed while the subprocess is still running. For more information see the SPS/Browser. | |
s-save, |
The user may save, change, delete or edit path names as part of the SPS configuration. Saved Path names are used for quick directory navigation. The following screen will appear:
| |
e-expand, | When issuing this request, VS will expand (reread) the current directory structure and update the screen if any changes were found. | |
*-all, | When displaying files, the request will change the star name to (current_dir)>*. When displaying processes SPS will change the user's mask to *.*. | |
c-clean, | This request will erase any commands from the operations codes area. | |
c-configure, | Will bring up the SPS Configuration Screen. See "System Configuration" for more details. | |
a-abbrev., | The request enables adding abbreviations to the user's (home_dir) >abbreviations file. SPS will call the edit command, the user will make changes to the abbreviations file, save the file and exit the editor. SPS will activate the new abbreviations file. | |
p-print, | Sends the current screen image to the local printer. | |
t-tree, | SPS starts the SPS/Tree program. The root directory is the user's current_dir directory. | |
r-ready, | This request will take the user out of the Shell Mode and start operating in the Ready Mode. In this mode there is no screen-driven interface and the user executes commands as if the process was working directly under VOS. | |
E-error, | This command allows to browse the daily VOS error log. VOS error logs are placed under the (master_disk)>system directory. For more information see: The SPS/Browser. | |
#-Calendar, | Start the SPS / Calendar program. | |
CANCEL-KEY | To exit any SPS screen use the standard Cancel-Key. |
Move Up/Down |
To move the current directory up one level in the directory hierarchy tree use the Move Up Dir Shorthand Request. To move the current directory down one level in the directory hierarchy tree use the Select Dir Internal Command. Put the sign (default is '>') next to the directory name you wish to go down to and press the Enter key. VS will then:
|
Cycle / Cycle-Back | SPS keeps track of the last twenty path names and the Type field associated with them. Use the Cycle or the Cycle-Back keys to cycle through the paths list until the desired path name is displayed. Press the Enter key to view the objects list. This feature is particularly useful when you need to switch back and forth from one directory to another. |
Using Saved Paths | Using Saved Path names is easiest and fastest way to navigate between the directories. Type the abbreviation and SPS will replace it with the saved path name and retrieve the objects. It is recommended that you define abbreviations for the directories that are often used. Up to 100 abbreviations can be defined in SPS. For more details see the explanation on the Save Path Name Shorthand Request. |
The Directory Tree | SPS-TREE is a built-in program that will give you a tree-like graphic presentation of your directory structure. The root directory for the TREE program will always be your current directory. The user can page up and down, move the pointer to any directory and then change your current_directory by pressing the Enter key. |
> - Select Directory | When displaying directories, position the cursor next to any directory, type the select_directory sign and press Enter. VS will then take you down to the selected directory. For more information see the See explanation under Move Up/Down requests. | ||
* - Generic Command |
Use the Generic Command if you do not have enough room to enter a command. SPS will display the object name selected and will prompt you to enter the required command. It is also useful to use this command if you want to perform more than one operation on a single object. All you have to do is enter the number of required operations next to the '*' command.
| ||
x - Execute Command | Use this command to execute any command macro (.cm) or program module (.pm) files. | ||
xf - Execute Command with -form | Works exactly like execute command but in addition it displays the command's CRT form before executing it. | ||
? - Where Command | Using this command will give information such as which include files your compiler picks up or which objects are used by the bind command etc. When listing Commands / Objects / Includes use this command to display the full path of the object. | ||
v-Browse Command | Evokes the SPS/Browser program. | ||
s-Stop Process | Stops the marked process(es). | ||
deb-Debug Process |
When listing processes use this command to start the mp_debug program. SPS will issue the following commands for you and put you in debug mode.
|
Cycle Last Used Commands:
The Command Line
Use the Command Line field to submit any command. To do so, tab the cursor to the Command Line field, type a command and press the Enter key. To execute the command with the -form option, press the display-form key. SPS will execute the command and return to the main screen.
SPS remembers the last five commands that were entered from the Command Line field. To retrieve previously entered commands tab to the Command Line field and press the Cycle or Cycle-Back keys to cycle to the required command, then press the Enter key to execute the command.
The Global Command
Use this command to execute a command on multiple files. Use the Mark key to mark the files then issue the Global Command Shorthand Request to evoke the Global Command (see the shorthand's description).
Programmed Function keys
The user can program and assign commands to the first 10 Function Keys (F1 to F10) as part of the VS configuration. Execute the System Configuration Shorthand Request and define the commands for each Function Key. (see System Configuration). Once your functions have been defined, evoke the command by pressing the Function Key.
Function Keys |
| |
Omit Files Star Names |
| |
Internal Commands |
|